A quick Note - plain old Windows Server 2008 (32 and 64 bit) uses the vista virtio drivers, when running it on a KVM hypervisor. It's based on vista, not Win7. Drove me nuts trying to get the virtIO network drivers running.
]]>Usual Disclaimer: If you misconfigure your firewall and somebody breaks in and steals / destroys your data, following this guide does not in any way make me liable for your loss.
I've seen plenty of posts blaming the playbook when the real problem lies with the configuration on the Cisco Device. This configuration works for me, and is intended to show the required settings on both ends of the connection, You may or may not be able to adjust the ASA side, depending on Corporate security policy, are you the admin responsible etc.
Lets get started, you will need a few things:
1. A Blackberry Playbook ;)
2. A Cisco ASA 5505 or better security appliance
3. Administrative access to said appliance, or a co-operative admin who does, and a good understanding of the cisco IPSec implementation.
4. A BACK UP OF YOUR ASA CONFIGURATION
5. A Second back up of the ASA configuration.
This document has some color coding:
blue - ASA configuration directives
orange - information you supply
Bold Orange - Parameters MUST Match between the ASA and the Playbook
ASA Configuration
The ASA has to allow ipsec traffic to it's outside interface: (two lines, mind the wrapping)
access-list outside-rules extended permit udp any host <IP_of_the_asa> eq isakmp
access-list outside-rules extended permit esp any host <IP_of_the_asa>
You need a pool of IP addresses to assign to your VPN clients: (single line)
ip local pool vpn_client_pool <start_IP_Address>-<end_IP_Address> mask <subnet_mask>
The ASA needs to allow vpn traffic to pass through. There's two ways to do this:
sysopt connection permit ipsec
or an access list entry to the outside interface allowing the traffic from the vpn subnet to the inside networks.
access-list outside-rules extended permit ip <vpn_client_net> <netmask> <inside_nets> <netmask>
We use a Radius server for VPN Auth from clients, there are other authentication mechanisms.. so you may or may not need this.
aaa-server vpn_clients protocol radius
aaa-server vpn_clients (inside) host <IP_of_the_radius_server>
key *****
authentication-port 1812
accounting-port 1813
instead of "protocol radius", you can use "protocol local" and supply usernames and passwords on the command line of the appliance:
username playbookuser password <Secret_Password> privilege 0
This option is not really related, but I find that on a VPN router, each encrypted packet can get too big (greater than 1500 bytes) and has to be fragmented to be sent out, I noticed my Playbook was having MTU trouble, so I set this to keep all traffic less than 1500 bytes:
sysopt connection tcpmss 1270
Here comes the crypto stuff.. first line sets the encryption algorithms, second one sets the amount of time before the IPSec Tunnel needs to be re negotiated (8 hours) , Fourth is the ammount of data (4GB in this case) Pick what you want in these two cases. The fifth line forces the ASA to fragment packets if they are too large, even if the hosts set the "Do not fragment" bit. The last line defines a dynamic ipsec map, and applies the transform set from line 1.
crypto ipsec transform-set trans_set_1 esp-3des esp-md5-hmac
crypto ipsec security-association lifetime seconds 28800
crypto ipsec security-association lifetime kilobytes 4194303
crypto ipsec df-bit clear-df outside
crypto dynamic-map vpn_clients_map 10 set transform-set trans_set_1
This maps the IKE (Internet Key Exchange) that allows the above negotiations to take place, and applies the map to the outside (Public Internet) interface of the device:
crypto map client_vpn 65535 ipsec-isakmp dynamic vpn_clients_map
crypto map client_vpn interface outside
Thiese are the actual IKE parameters, Note, the ASA can have more than one of these, for different types of VPNs:
crypto isakmp identity address
crypto isakmp enable outside
crypto isakmp policy 65535
authentication pre-share
encryption 3des
hash sha
group 2
lifetime 86400
VERY IMPORTANT:
By default an ASA ships with the following directive:
no crypto isakmp nat-traversal
The PlayBook will not connect if this is present in your config. Get rid of it by typing:
crypto isakmp nat-traversal
Yes, backwards, not a Typo. This line controls how the ASA handles clients behind NAT Devices. The Cisco VPN client for windows does not care if this is here or not, but the PlayBook does. once the command is entered, you won't see it when you show the running config.
Now you need a Group to assign information to the VPN Clients. My group below includes laptops and remote users, so I have splittunnel set up. The Playbook ignores the split tunnel part of the configuration, hence why it cannot connect to the public Internet directly when connected to the VPN
group-policy vpn_client_group internal
group-policy vpn_client_group attributes
wins-server value <primary_WINS_Server_IP> <secondary_WINS_server_IP>
dns-server value <primary_DNS_server_IP> <secondary_DNS_server_IP>
vpn-idle-timeout 20
ipsec-udp enable
ipsec-udp-port 10000
split-tunnel-policy tunnelspecified
split-tunnel-network-list value splittunnel
And finally, you need to define the group name and pre shared keys, these commands bind together the tunnel group policy with a group name and preshared key:
tunnel-group vpn_client_tunnel_group type remote-access
tunnel-group vpn_client_tunnel_group general-attributes
address-pool vpn_client_pool
authentication-server-group vpn_clients
default-group-policy vpn_client_group
tunnel-group vpn_client_tunnel_group ipsec-attributes
pre-shared-key <secret_password>
isakmp keepalive threshold 40 retry 5
On to the PlayBook Configuration:
Choose Settings --> Security --> VPN --> Add New
Profile Name <whatever_you_want>
Server Address <Outside_Internet_Address_Of_Your_ASA>
Gateway Type Cisco ASA
Authentication Type XAUTH-PSK
Group Username vpn_client_tunnel_group
Group Password <secret_password>
Username <username> (your vpn credentials, or the user pass entered into the asa)
Password <Your_Password>
Check Automaitcally Determine IP and DNS
IKE Lifetime (seconds) 28800
IPSec Lifetime (seconds) 3600
NAT Keepalive (seconds) 30
DPD Frequency (seconds) 240
Notes:
You can get outside http and https access while being connected to the VPN by setting up a proxy server on your corporate network. On the Playbook under the VPN configuration screen from above, at the bottom you will see Use HTTP Proxy. check it off, and enter the IP address and port for your proxy server, along with credentials. This allows the browser, app world, and some apps (Not IM+) to go out through the proxy server to the public Internet.
This works for me using the following OS versions:
ASA 5520 OS Ver 8.2(5) with the free Strong Encryption license from Cisco
PlayBook OS 1.0.8.6067
]]>The old versions of the vmware-viclient.exe pass the wrong options to the windows installer. You have to extract the .msi file from the .exe file manually.
1. Download the viclient from the esx server, save it somewhere.
2. open a command prompt and cd to the directory you saved the file (downloads in this example)
cd c:\downloads
3. run this command:
VMware-viclient.exe /x /d c:\downloads\first
(you must use the full path after the /d switch, Windows is not a real OS like linux that understands things like current working directory)
4. cd to the right place:
cd c:\downloads\first\bin
4. run this command:
vmware-viclient.exe /a /s /v" /qn TARGETDIR=C:\downloads\second"
5. browse to c:\downloads\second
double click the .msi file
this wont install any shortcuts in the start menu, but if you install the latest esx 4.1 client, it will load the older clients automatically when connecting to an older host.
]]>We accomplish this using drbd, and heartbeat
This Guide assumes you have two identicaly configured systems, with an empty partition on each node that is un-formatted and ready to go. It also assumes a dedicated crossover connection between network cards on both nodes.
This setup was completed on a CentOS 5.5 system, utilizing the centosplus yum repository for drbd and the fedora epel repository for heartbeat.
Installing
I use epel, centosplus, centos extra yum repositories, after setting them up do:
yum install drbd83 kmod-drbd83 heartbeat
If you want to use the xfs file system (wonderful for big files on big filesystems.. vmware anyone?)
yum install xfsprogs kmod-xfs
DRBD Configuration
You need a blank, unformatted block device, it can be a partition (/dev/sdb1 for example) or it can be a whole block device (/dev/sdb) careful not to use any in use file systems. (it is possible to turn an existing filesystem with existing data into a drbd device, that's another blog)
we need to set up the distributed block devices to mirror the main data file systems:
edit /etc/drbd.conf :
global {
usage-count yes;
}
common {
protocol C;
}
resource drbd0 {
device /dev/drbd0;
disk <your_blank_drbd_partition eg: /dev/sdb1>;
meta-disk internal;
handlers {
pri-on-incon-degr "echo o > /proc/sysrq-trigger ; halt -f";
pri-lost-after-sb "echo o > /proc/sysrq-trigger ; halt -f";
local-io-error "echo o > /proc/sysrq-trigger ; halt -f";
split-brain "/usr/lib/drbd/notify-split-brain.sh <your_name@email_server>";
}
startup {
degr-wfc-timeout 120;
}
disk {
on-io-error detach;
no-disk-flushes;
no-md-flushes;
}
net {
cram-hmac-alg "sha1";
shared-secret "HaDxWpLXRIB6dxa54CnV";
after-sb-0pri disconnect;
after-sb-1pri disconnect;
after-sb-2pri disconnect;
rr-conflict disconnect;
}
syncer {
rate 100M;
al-extents 257;
csums-alg sha1;
}
on drbd-lvm-test1 {
address <ip_address_of_node1>:7789;
}
on drbd-lvm-test2 {
address <ip_address_of_node2>:7789;
}
}
then issue these commands on BOTH nodes:
drbdadm create-md drbd0
service drbd start
you can see the device sucessfully created, by issuing:
cat /proc/drbd
Issue the following command on the PRIMARY node (Only one)
drbdadm -- --overwrite-data-of-peer primary drbd0
Wait for the Sync to complete, just periodically run cat /proc/drbd until it looks like this:
version: 8.3.8 (api:88/proto:86-94)
GIT-hash: d78846e52224fd00562f7c225bcc25b2d422321d build by mockbuild@builder10.centos.org, 2010-06-04 08:04:09
0: cs:Connected ro:Primary/Secondary ds:UpToDate/UpToDate C r----
ns:223608780 nr:0 dw:44 dr:223610936 al:1 bm:13649 lo:0 pe:0 ua:0 ap:0 ep:1 wo:b oos:0
Create an LVM stack on top of the drbd device, edit lvm.conf to force lvm to ignore the underlying block device(s) that are being used by drbd. This will prevent LVM from starting on the wrong device when heartbeat starts it up.
On BOTH Nodes:
vim /etc/lvm/lvm.conf
comment out this line:
#filter = [ "a/.*/" ]
Add this line so LVM ignores the block device that drbd sits on top of:
filter = [ "a|drbd.*|", "r|/dev/sda3|" ]
On the drbd PRIMARY node Only:
pvcreate /dev/drbd0
vgcreate <volume_group_name> /dev/drbd0
lvcreate -l 100%FREE -n <logical_volume_name> <volume_group_name>
create an XFS file system on the logical volume created above, I suggest you use the tuning parameters below:
mkfs.xfs -f -d su=256k,sw=<number_of_data_disks_in_the_raid> -l size=64m /dev/<volume_group_name>/<logical_volume_name>
- the sw parameter is the number of data disks in the array, example: if there are 24 drives, and 2 are used as hot spares, 2 are used for raid6, then sw=20
make sure it all works:
mkdir /data && mount /dev/<volume_group_name> /<logical_volume_name>
setting up heartbeat is next so we need to make sure the filesystem is un-mounted:
umount /data
The NFS metadata has to go on to the shared block device, otherwise, all your NFS clients will suffer from "Stale NFS File Handle" errors, and will need to be rebooted when your cluster fails over, not good.. so this procedure must be done on both nodes, one after the other:
On Node1:
Change where the rpc_pipefs file system gets mounted:
mkdir /var/lib/rpc_pipefs
vim /etc/modprobe.d/modprobe.conf.dist
locate the module commands for sunrpc, and change the mount path statement from /var/lib/nfs/rpc_pipefs to /var/lib/rpc_pipefs
vim /etc/sysconfig/nfs
Add this line to the bottom:
RPCIDMAPDARGS="-p /var/lib/rpc_pipefs"
reboot the node.
Make it the primary drbd node:
drbdadm primary drbd0
scan for the volume group on the drbd0 block device:
vgscan
Make the drbd volume group active:
vgchange -a y
mount the xfs file system:
mount /dev/<volume_group_name>/<logical_volume_name> /data
Move /var/lib/nfs to the shared filesystem:
mv /var/lib/nfs /data/
ln -s /data/nfs /var/lib/nfs
Put the nfs exports config file in the shared file system as well:
mv /etc/exports /data/nfs/
ln -s /data/nfs/exports /etc/exports
create a dir under /data for export:
mkdir /data/supercriticalstuff
export it:
echo "/data/supercriticalstuff *(ro,async,no_root_squash)" >> /data/nfs/exports
edit /etc/init.d/nfs, and change killproc nfs -2 to killproc nfs -9, to make sure nfs really dies when stopped:
back it up so you can fix it after rpm updates:
cp /etc/init.d/nfs ~/nfs_modded_init_script
Start NFS and make sure it all works:
service nfs start
now on to Node 2: shut down NFS on Node 1
umount /data
deactivate the logical volume:
vgchange -a n
give up the drbd resource:
drbdadm secondary drbd0
On Node 2:
Change where the rpc_pipefs file system gets mounted:
mkdir /var/lib/rpc_pipefs
vim /etc/modprobe.d/modprobe.conf.dist
locate the module commands for sunrpc, and change the mount path statement from /var/lib/nfs/rpc_pipefs to /var/lib/rpc_pipefs
vim /etc/sysconfig/nfs
Add this line to the bottom:
RPCIDMAPDARGS="-p /var/lib/rpc_pipefs"
reboot the node.
Make it the primary drbd node:
drbdadm primary drbd0
scan for the volume group on the drbd0 block device:
vgscan
Make the drbd volume group active:
vgchange -a y
mount the xfs file system:
mount /dev/<volume_group_name>/<logical_volume_name> /data
get rid of /var/lib/nfs, and /etc/exports
rm -rf /var/lib/nfs
rm -f /etc/exports
Make the appropriate symlinks:
ln -s /data/nfs /var/lib/nfs
ln -s /data/nfs/exports /etc/exports
edit /etc/init.d/nfs, and change killproc nfs -2 to killproc nfs -9, to make sure nfs really dies when stopped:
back it up so you can fix it after rpm updates:
cp /etc/init.d/nfs ~/nfs_modded_init_script
Start NFS and make sure it all works:
service nfs start
shut down NFS
umount /data
deactivate the logical volume:
vgchange -a n <volume_group_name>
give up the drbd resource:
drbdadm secondary drbd0
On Both Nodes:
edit /etc/hosts - make sure both cluster nodes on both hosts are listed using their crossover IP addresses.
rpm -Uvh http://download.fedora.redhat.com/pub/epel/5/i386/epel-release-5-4.noarch.rpm
yum install heartbeat heartbeat-stonith heartbeat-pils
NOTE - make sure yum only tries to install the x86_64 version of the rpm, you may have to specify the exact version like so:
yum install heartbeat-2.1.4-11.el5.x86_64 (the version number might not be as shown here, check the output of yum for the right rpm)
edit /etc/ha.d/ha.cf :
logfacility local0
keepalive 5
deadtime 20
warntime 10
udpport 695
bcast bond0 # ethernet interface 1
bcast bond1 # ethernet interface 2
bcast bond2 # ethernet interface, or serial interface
auto_failback off
node node1 node2
respawn hacluster /usr/lib64/heartbeat/ipfail
edit /etc/ha.d/haresources:
node1 \
IPaddr2::<virtual_ha_ip_address>/24/bond0 \
IPaddr2::<virtual_ha_ip_address>/24/bond1 \
drbddisk::drbd0 \
LVM::ha-lvm \
Filesystem::/dev/<volume_group_name>/<logical_volume_name>::/<mountpoint>::xfs::rw,nobarrier,noatime,nodiratime,logbufs=8 \
nfslock \
nfs \
Note: use ip address that are NOT currently assigned to any network adapters. This IP will move from host to host as the cluster fails over.
edit /etc/ha.d/authkeys:
auth 2
2 sha1 <random_gibberish_20_carachetrs_long>
chmod 600 /etc/ha.d/authkeys
make sure the HA services are disabled at boot:
chkconfig nfs off
chkconfig nfslock off
chkconfig heartbeat on
On the primary node:
service heartbeat start && tail -f /var/log/messages
make sure the file system is mounted:
mount
make sure the HA IP address is up:
ip addr
On the secondary node:
service heartbeat start
/var/log/messages should show: Status update: Node node1 now has status active
/var/log/messages on the primary node should show the secondary node joining the cluster
service heartbeat stop on the primary node, make sure the services fail over properly
halt -p
do it a few timesa fail the services back and forth while the nfs export is mounted from another system to make sure everything fails over as it should.
enjoy an active/passive NFS server.
]]>First thing we need to do is get rid of the default KDE bluetooth manager, because quite frankly it sucks. It will not allow you to add a bluetooth device if it is not an Input device like a mouse or keyboard.
sudo apt-get remove kbluetooth
Now we have to install a bunch of packages:
sudo apt-get install blueman bluex bluez-btsco bluez-COMPAT pulseaudio-* paprefs paman padevchooser
That's a lot of stuff.. I'll attempt to explain:
blueman is the replacement for kbluetooth, and will let you pair up any kind of device.. the bluez packages contain the bluetooth modules you will need, and pulseaudio is required as well because ALSA (The default sound system in kubuntu) does not do bluetooth audio very well.
It's a good idea to reboot your system after installing all these packages.
Once you have all the above packages installed you will need to pair up the headset with your bluetooth stack.
Make sure your bluetooth dongle / adapter is enabled and turned on
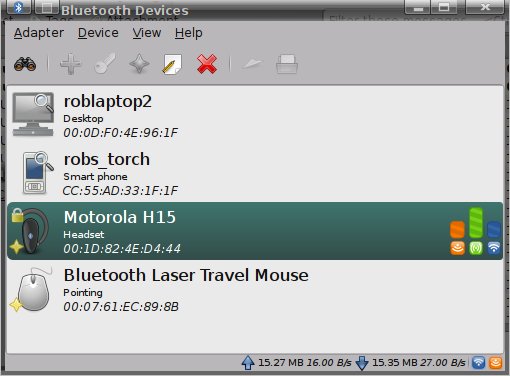
Put the headset into pairing mode and launch blueman-applet, either from the CLI or the kde menu, and click on the binoculars to search for a device, once it appears, select it and choose the Setup Assistant (Pencil and Paper icon) The pairing steps are pretty straight forward.
Next we need to make sure pulseaudio sees your newley paired headset:
pavucontrol
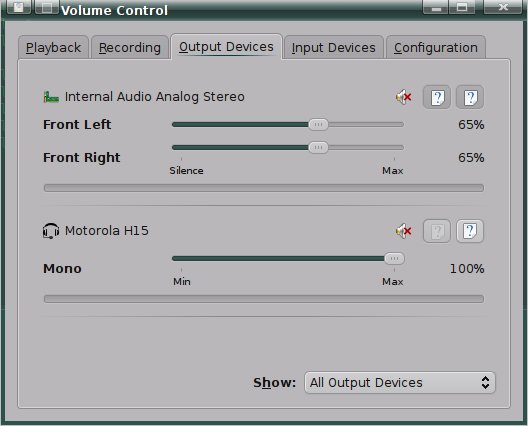
You should see your headset listed here on both the Output and Input devices tab
Next we need to get both the sound device name (sink) and the microphone device name (output) for your headset:
pactl list
Should generate a bunch of output. You are looking for two sections, sink and output that contain bluez in the name like this:
This is the Speaker for your headset, you can identify the name by the mac address for your headset (Yours will be different than shown here)
Sink #3
State: SUSPENDED
Name: bluez_sink.00_1D_82_4E_D4_44
Description: Motorola H15
Driver: module-bluetooth-device.c
Sample Specification: s16le 1ch 8000Hz
Channel Map: mono
Owner Module: 19
Mute: no
Volume: 0: 100%
balance 0.00
Base Volume: 100%
Monitor Source: bluez_sink.00_1D_82_4E_D4_44.monitor
Latency: 0 usec, configured 0 usec
Flags: HARDWARE HW_VOLUME_CTRL LATENCY
Properties:
bluetooth.protocol = "sco"
device.intended_roles = "phone"
device.description = "Motorola H15"
device.string = "00:1D:82:4E:D4:44"
device.api = "bluez"
device.class = "sound"
device.bus = "bluetooth"
device.form_factor = "headset"
bluez.path = "/org/bluez/1250/hci0/dev_00_1D_82_4E_D4_44"
bluez.class = "0x200404"
bluez.name = "Motorola H15"
device.icon_name = "audio-headset-bluetooth"
This is the Microphone:
Source #7
State: SUSPENDED
Name: bluez_source.00_1D_82_4E_D4_44
Description: Motorola H15
Driver: module-bluetooth-device.c
Sample Specification: s16le 1ch 8000Hz
Channel Map: mono
Owner Module: 19
Mute: no
Volume: 0: 100%
balance 0.00
Base Volume: 100%
Monitor of Sink: n/a
Latency: 0 usec, configured 0 usec
Flags: HARDWARE HW_VOLUME_CTRL LATENCY
Properties:
bluetooth.protocol = "hsp"
device.intended_roles = "phone"
device.description = "Motorola H15"
device.string = "00:1D:82:4E:D4:44"
device.api = "bluez"
device.class = "sound"
device.bus = "bluetooth"
device.form_factor = "headset"
bluez.path = "/org/bluez/1250/hci0/dev_00_1D_82_4E_D4_44"
bluez.class = "0x200404"
bluez.name = "Motorola H15"
device.icon_name = "audio-headset-bluetooth"
bluetooth.nrec = "1"
Note: Do not pick the names with the word "monitor" in them
Next we need to create a file in our home directories:
vim ~/.asoundrc
with the following contents:
pcm.<You_pick_devicename> {
type pulse
device <devicename_from_output_of_pactl_list>
hint {
description "<your_description>"
}
}
pcm.<you_pick_mic_devicename> {
type pulse
device <devicename_from_output_of_pactl_list>
hint {
description "<your_description>"
}
}
This file will contain a mapping from a virtual ALSA audio device to the pulseaudio device that coresponds to your bluetooth headset. For example, my config:
pcm.h15_sink {
type pulse
device bluez_sink.00_1D_82_4E_D4_44
hint {
description "Motorola H15 - Speaker"
}
}
pcm.h15_source {
type pulse
device bluez_source.00_1D_82_4E_D4_44
hint {
description "Motorola H15 - Microphone"
}w
}
My workplace has an Asterix PBX, so I use Twinkle for my IP softphone. All that remains to do is set up Twinkle to use the config above. Launch Twinkle and hit edit --> System Settings --> Audio
For Speaker, choose "ALSA: other device" and in the box below, put the name of the "sink" device you configured above.. (In my case h15_sink)
For Microphone, choose "ALSA: other device" and in the box below, put the name of the "source" device you configured above (In my case h15_source)
When I installed Skype, it defaulted to the pule audio driver, and my headset just worked out of the box.
After that, fire it up and enjoy.
]]>I did this with a Cisco 2691 router, with two wic-1adsl line cards.
Since giving Shaw the boot, and because of the number of remote systems I have collecting mail off of my mail server, I needed a bit more bandwidth especially in the upload speed department.
What I used:
1 phone line, 1 dry DSL copper pair. We actually have 3 lines coming into the house, but our main phone line has an alarm system attached inline - The phone line goes through the alarm box before going to the distribution panel. Alarm systems are incompatible with ADSL (there are sites that show you how to do it if you must, but avoid it if you can)
1 Cisco 2691 series router, with an advanced enterprise IOS, and two wic-1adsl wan cards.
2 6/1 unlimited business adsl lines with a static IP, I also have a /29 subnet for my server.
- NOTE - I first tried this with a 2611XM, bad idea, it does not even have enough CPU to run even 1 wic-1adsl card at full speed, never mind 2. Unlike the ethernet interfaces in the 2600 series, the wic cards are serial cards, and are extremely cpu intensive. On my 2611, a 5 Mbps download would pin the CPU at 100%. If you are using a 2600 series router, the smallest I think you could get away with is a 2651XM.
Once the DSL service is installed, the configuration is fairly straight forward, here are the relevant parts of mine:
A note about multiple Dialer interfaces, they are Not needed. I've seen postings with more than one dialer interface, I do not believe this necessary. My config works fine with one dialer interface.
1st adsl line card:
interface ATM0/0
no ip address
atm restart timer 300
no atm ilmi-keepalive
bundle-enable
dsl operating-mode auto
hold-queue 224 in
!
interface ATM0/0.1 point-to-point
description ADSL Interface 0
pvc 0/33
pppoe-client dial-pool-number 1
!
Second ADSL Line card:
interface ATM0/1
no ip address
atm restart timer 300
no atm ilmi-keepalive
bundle enable
dsl operating-mode auto
hold-queue 224 in
!
interface ATM0/1.1 point-to-point
description ADSL Interface 1
pvc 0/33
pppoe-client dial-pool-number 1
!
!
interface FastEthernet0/0
description Inside Ethernet interface
ip address 192.168.0.1 255.255.255.0
ip access-group 101 in
ip verify unicast reverse-path
no ip redirects
no ip unreachables
no ip proxy-arp
ip nat inside
ip inspect fast_eth0_in in
ip virtual-reassembly
ip route-cache flow
ip tcp adjust-mss 1430
no ip mroute-cache
duplex auto
speed auto
and finally the Dialer interface:
interface Dialer1
description Public Internet Interface
mtu 1477
ip address negotiated
ip access-group 112 in
ip verify unicast reverse-path
no ip redirects
no ip unreachables
no ip proxy-arp
ip nat outside
ip inspect fast_eth0_in in
ip virtual-reassembly
encapsulation ppp
ip tcp adjust-mss 1430
no ip mroute-cache
dialer pool 1
dialer-group 1
no cdp enable
ppp authentication chap pap callin
ppp chap hostname <username>@teksavvy.com
ppp chap password 7 <secret_password>
ppp pap sent-username <username>@teksavvy.com password 7 <secret_password>
ppp ipcp dns request accept
ppp ipcp route default
ppp ipcp address accept
ppp link reorders
ppp multilink
The remainder is fairly straight forward Cisco IOS firewall stuff with CBAC.
Some notes:
ppp multilink adds some more overhead to packets, so to ensure I don't get excessive fragmentation, I set the mtu on the dialer interface to 1477 and the tcp mss adjust to 1430.
tcp mss adjust monitors the packets between two hosts, and adjusts the mss (maximum segment size) they negotiate to this number.
Trouble shooting:
make sure both adsl cards are up:
show dsl interface
ATM0/0
Alcatel 20150 chipset information
ATU-R (DS) ATU-C (US)
Modem Status: Showtime (DMTDSL_SHOWTIME)
DSL Mode: ITU G.992.1 (G.DMT) Annex A
ITU STD NUM: 0x01 0x1
Vendor ID: 'ALCB' 'BDCM'
Vendor Specific: 0x0000 0xA10C
Vendor Country: 0x00 0xB5
Capacity Used: 60% 94%
Noise Margin: 13.5 dB 6.0 dB
Output Power: 9.0 dBm 12.0 dBm
Attenuation: 15.0 dB 9.5 dB
Defect Status: None None
Last Fail Code: None
Selftest Result: 0x00
Subfunction: 0x15
Interrupts: 3989 (0 spurious)
PHY Access Err: 0
Activations: 3
LED Status: ON
LED On Time: 100
LED Off Time: 100
Init FW: embedded
Operation FW: embedded
SW Version: 3.8131
FW Version: 0x1A04
Interleave Fast Interleave Fast
Speed (kbps): 6144 0 960 0
Cells: 74327163 0 1703360009 0
Reed-Solomon EC: 0 0 0 0
CRC Errors: 0 0 13 0
Header Errors: 0 0 3 0
Bit Errors: 0 0
BER Valid sec: 0 0
BER Invalid sec: 0 0
LOM Monitoring : Disabled
<snip>
DSL: Training log buffer capability is not enabled
ATM0/1
Alcatel 20150 chipset information
ATU-R (DS) ATU-C (US)
Modem Status: Showtime (DMTDSL_SHOWTIME)
DSL Mode: ITU G.992.1 (G.DMT) Annex A
ITU STD NUM: 0x01 0x1
Vendor ID: 'ALCB' 'BDCM'
Vendor Specific: 0x0000 0xA10C
Vendor Country: 0x00 0xB5
Capacity Used: 62% 93%
Noise Margin: 13.0 dB 7.0 dB
Output Power: 10.0 dBm 12.0 dBm
Attenuation: 14.5 dB 9.5 dB
Defect Status: None None
Last Fail Code: None
Selftest Result: 0x00
Subfunction: 0x15
Interrupts: 3990 (0 spurious)
PHY Access Err: 0
Activations: 3
LED Status: ON
LED On Time: 100
LED Off Time: 100
Init FW: embedded
Operation FW: embedded
SW Version: 3.8131
FW Version: 0x1A04
Interleave Fast Interleave Fast
Speed (kbps): 6144 0 960 0
Cells: 74381670 0 1703304507 0
Reed-Solomon EC: 0 0 0 0
CRC Errors: 0 0 1 0
Header Errors: 0 0 0 0
Bit Errors: 0 0
BER Valid sec: 0 0
BER Invalid sec: 0 0
LOM Monitoring : Disabled
Watch Noise margin and attenuation, for what the numbers mean, look at the bottom of this page: http://teksavvy.com/en/support.asp
and have a look to see if the multilink has come up:
show ppp multilink
Virtual-Access2, bundle name is 343630383332303032320000000000
Endpoint discriminator is 343630383332303032320000000000
Bundle up for 1w1d, total bandwidth 1952, load 1/255
Receive buffer limit 24384 bytes, frag timeout 1000 ms
Using relaxed lost fragment detection algorithm.
Dialer interface is Dialer1
0/0 fragments/bytes in reassembly list
4907 lost fragments, 1313946 reordered
3701/5276490 discarded fragments/bytes, 3701 lost received
0x76569A received sequence, 0xAE320E sent sequence
Member links: 2 (max not set, min not set)
Vi3, since 1w1d, unsequenced
Vi1, since 1w1d, unsequenced
No inactive multilink interfaces
DSL: Training log buffer capability is not enabled
You can see from the output, the interface Virtual-Access2 is made up of Virtual interfaces Vi3 and Vi1
Speed test results:
I typically see about 1 to 1.2 KBytes per second downloads, particularly from Microsoft..
]]>This recepe makes a 2.5 pound loaf. We have a Philips horizontal 2.5 pound loaf bread maker.
Put the ingredients in the bread maker in the following order:
Water - 2 1/4 cups
Lemon Juice - 1 tbsp
Skim milk powder - 1/2 cup
Salt - 2 tsp
Shortening - 2 tbsp (we use tenderflake, b/c it's natural lard, not hydrogenated junk like crisco)
Molasses - 3 tbsp
Whole wheat flour - 2 cups (we use stone ground organic)
Wheat gluten - 1/2 cup (helps glue things together. without this you get a crumbly brick)
Rye flour - 2 cups
Wheat Bran - 4 tbsp
Assorted seeds - 1/2 cup (sunflower, millet, whole oats, flax seed) - play with this to suit your taste.
Bread Machine yeast - 1tbsp
Put the ingredients in the breadmaker in the order listed above, select the whole wheat program, and the 2.5 pound loaf size, and your taste for crust color. This results in a very tasty, dark, high fiber bread. It's a bit heavy, but my personal tastes favor that kind of thing.
- Notes -
I was a bit challenged trying to figure out what wheat gluten was, I found it from these folks in the baking aisle at our local grocery:
http://www.bobsredmill.com
enjoy !
]]>What does this mean? forget downloading movies, music, or uploading lots of pictures to facebook, If you use Netflix, get out your wallet.
I have a feeling this move by the big companies is meant to make netflix more expensive than staying on their own poor TV service.
Basically what this means is that this ruling has cleared the way for the Big providers, Shaw, Telus and Bell to set a ridiculously low bandwidth limit on your home Internet connection, and then charge you through the nose for anything over that limit. Basically the same deal as your cell phone. You will see this ruling commonly referred to as "UBB" or usage based billing.
More Information:
http://tinyurl.com/UBBExplained
http://tinyurl.com/WakeUpCanada
http://stopusagebasedbilling.wordpress.com/
You can sign a petition for the idiots in Ottawa here:
http://openmedia.ca/meter
Please fill out the petition, This will really hurt small businesses, and will cause Canada to have the highest cost for Internet in the world.
I am not totally opposed to the idea of only paying for what you use, but in it's current form it is a blatant rip off. It only costs about $0.01 to $0.10 cents per gigabyte to transfer data on the internet (that price includes the cost of the infrastructure). I would sign up for a plan tomorrow that charged me $10.00 per month maintenance, and then $0.25 per Gigabyte I used. The current plans are a rip off pure and simple.
]]>